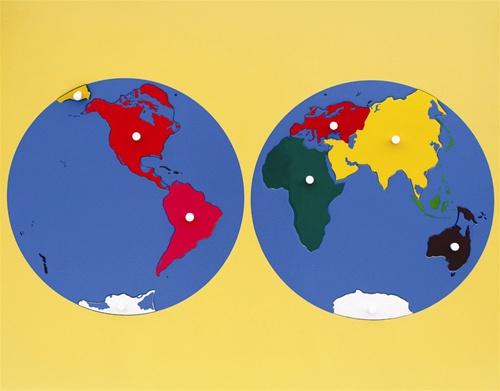
Many of the activities we do in our Montessori home school classroom require little investment, since they use things we already have. But from time to time, an activity calls for something that we don't have and that isn't particularly easy to make. Usually we head over to Alison's Montessori (their link is here) and just bite the bullet. But when we started doing our continent study (see the globe we made here), I was loathe to spend almost $50 on a puzzle that Bella's only likely to use a few times. This is the puzzle in question:
The curriculum suggested creating this out of foamboard if you didn't want to buy it. But if you've ever tried to cut foamboard...particularly if you've tried to cut foamboard accurately...you know that it's easier said than done.
Since I recently discovered the wood hobby shop at Camp Lejeune, I decided I wanted to try to make one myself out of wood. I had already used the bandsaw for my laundry project (see that here), but this involved using the scrollsaw, which is able to make the much tighter turns required for this project. This whole thing was made even more daunting by the fact that I only had one shot at the cuts. If I messed up, I could go back and trim a little bit more off, because the pieces had to fit together like a puzzle. I got to practice with the scrollsaw when I did the areas on the inside parts of the laundry room letters (like 'A' and 'R') and it didn't really go so well. I managed to break a blade and give myself quite a scare in the process (it's loud when a blade breaks). So I was very nervous going in.
The first step was to put the outline of what I was cutting onto the wood so I had a guide to work from. I started with some cutouts of the actual puzzle. I blew them up so they were close to 8 inches wide.
See that black stuff in the photo? That's carbon paper. (How many of you had no clue? Seriously now!) Carbon paper (for the young whipper snappers) is coated on one side. When you press down on it, you push that coating onto the surface under it. So...if you put a piece of paper on top of it, and a piece of wood under it, and then trace over the outlines, it leaves the same outlines on the bottom wood.
Like this:
You can see that, for sanity and utility reasons, I approximated some of the edges. This ended up being fine since I was going to paint it in the end.
The wood here is about 1/8 inch thick. This is oak because that was what the wood shop had that was wide enough. Then I took it to the saw and started cutting...very carefully.
I'm not gonna lie, it wasn't easy, but I did settle into a rhythm by the end. I technically could have avoided the cut marks from the edge to the cutouts by drilling a tiny hole and threading the saw blade through it, but I was worried about leaving a drill hole in one of my pieces, so I decided to live with the cut marks.
I didn't want the pieces to slide through the cutouts into nothingness though, so that meant putting the wood with the cutouts onto another solid piece. I sanded the edges of the cutouts prior to this to make sure the edges weren't sharp.
Then I used some wood glue and glued the piece with the cutouts onto the solid piece and I clamped it together.
Even with these 4 clamps, the inside areas started to curl up after I left, so the wood shop guys put some bigger clamps on all over it to make sure it didn't get ruined. Whew!
Then I painted the oceans and islands, sanded the puzzle pieces, and painted them so they matched the colors of the continents on the globe (see that here) and on the continent folders (more on that soon!).
Here is the finished product:
I decided I sort of liked seeing the grain of the wood through the paint, so I only did 1 coat on the oceans.
I used the carbon paper again to get the exact outline of the continents onto the pieces (as opposed to the pretty vague outlines that I cut out). I also painted the names of the continents under each one on a last minute whim.
Many wooden puzzles have little knobs to pull out the pieces with. I had bought some wooden push pins to use, but then I decided I liked it better with no knobs. We just have to turn the puzzle over to dump the pieces out.
So, what do you think? Would you ever try making something like this? Does the thought of cutting foamboard overwhelm you too?


No comments:
Post a Comment