Monday, April 16, 2012
Fire Planes
We were hanging out when 2 airplanes started landing on the river outside our backyard to scoop up water. They are taking it over across the river to a forest fire. It was pretty cool to watch. I couldn't really video the drop as well, but it was cool to watch with the binoculars.


Monday, April 9, 2012
Oh Say can you Sea
I ran across a picture like this in Cracker Barrel this morning and I thought it was so awesome, I decided to recreate it. And share it of course :)

Hope you like it!

Hope you like it!
Monday, March 5, 2012
Overheard: Shut it
Last week we were back in my hometown visiting family. We went out to eat one night, and the conversation got a bit loud. Bella looked at my grandmother and said, "Nanny, shut your mouth."
The table laughed and then went a bit quiet. So I told Bella that maybe we needed to find a nicer way of asking Nanny to speak more quietly.
Bella contemplated this, then looked at Nanny and said, "Nanny, shut your mouth... please"
The table laughed and then went a bit quiet. So I told Bella that maybe we needed to find a nicer way of asking Nanny to speak more quietly.
Bella contemplated this, then looked at Nanny and said, "Nanny, shut your mouth... please"
Thursday, March 1, 2012
House Tour: Bella's Bedroom
You know how I started taking you on a tour of our house a while back? Like...8 months ago? I happened to have my camera handy, so I took the pictures to take you on a tour of our daughter, Bella's, room (to tour our entryway click here, to tour our master bedroom click here, to tour our guest bedroom click here, to tour our classroom click here).

The entry to Bella's room is a poufy pink flower/wreath made out of coffee filters. (Here is how I made it)
 Her room is a little long and narrow, so we used the bed to divide the room into a 'reading/play' side and a 'getting ready' side.
These are the 3 stuffed animals that garner the most attention. Baby David (named after Elmo's doll), Giraffe (so creative), and Mila Monkey (we named it when we gave it to her for her christening). I recently saw an absolutely hilarious video about kids naming their toys. If you have a few minutes, it's worth watching here.
 Her current bed is her crib converted into a full sized bed. It was the Babi Italia Pinehurst set in Espresso. We have the changing table converted into a regular dresser too.
B doing what she does best

A Bella's eye view from bed of her new butterfly mobile (I'll share that project soon)

Little baby feet. This is the original stamping of her feet when she was just a few hours old.

 A Pottery Barn lamp that we snagged on clearance.
 A recap of her first year, always fun to remind myself of how fast the time goes by. I didn't think I would love this as much as I do.


Now you can see the sink area of her bathroom. The bathroom is sort of a jack and jill style. It has the toilet and shower in the center room with pocket doors on either side leading to a sink area on each side.


The reading/play side of the room:
Can you find the silliest toy of all?

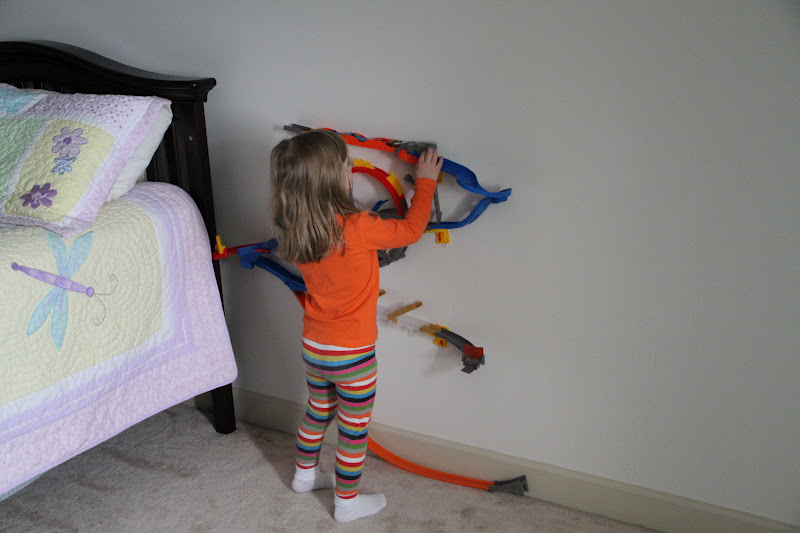
The hot wheels wall track was an addition after this past Christmas and it's one of the only real 'toys' in her room. We usually play in the basement and reserve the bedroom for sleep or reading, but this is a fun distraction for her while I'm doing chores upstairs.


 Jacques and de Beanstalk and the Three Little Cajun Pigs by Mike Artell and Jim Harris, some autographed favorites from New Orleans

Classic Fairy Tales by Scott Gustavson; the illustrations in this book are phenomenal. I can't even explain it. We're actually putting together a puzzle now from the Jack and the Beanstalk illustration in this book.

So, there it is, Bella's bedroom. Stay tuned, I may even finish the house tour this year!


The entry to Bella's room is a poufy pink flower/wreath made out of coffee filters. (Here is how I made it)

These are the 3 stuffed animals that garner the most attention. Baby David (named after Elmo's doll), Giraffe (so creative), and Mila Monkey (we named it when we gave it to her for her christening). I recently saw an absolutely hilarious video about kids naming their toys. If you have a few minutes, it's worth watching here.

B doing what she does best

A Bella's eye view from bed of her new butterfly mobile (I'll share that project soon)

Little baby feet. This is the original stamping of her feet when she was just a few hours old.


We hung the mirror that used to live above our fireplace over her dresser to give it a more grown up look. It reflects the paper butterflies over her bed and part of her new mobile.

A Bella's eye view from bed. That door is the door to her bathroom.

Now you can see the sink area of her bathroom. The bathroom is sort of a jack and jill style. It has the toilet and shower in the center room with pocket doors on either side leading to a sink area on each side.

Here is the bath area. If you walk through it leads to the classroom.

The reading/play side of the room:
Can you find the silliest toy of all?

The hot wheels wall track was an addition after this past Christmas and it's one of the only real 'toys' in her room. We usually play in the basement and reserve the bedroom for sleep or reading, but this is a fun distraction for her while I'm doing chores upstairs.
Our reading area by the window, with front facing bookshelves. The post where I made the larger stand up bookshelf is here if you're curious.

The hanging bookshelf (I talked more about that here in another post. You can see we've rearranged a bit since then too)

Some of our favorite books from the reading area:
My Name is not Isabella by Jennifer Fosberry, all about teaching little girls to be empowered and dream big. And of course, the main character has the perfect name :)

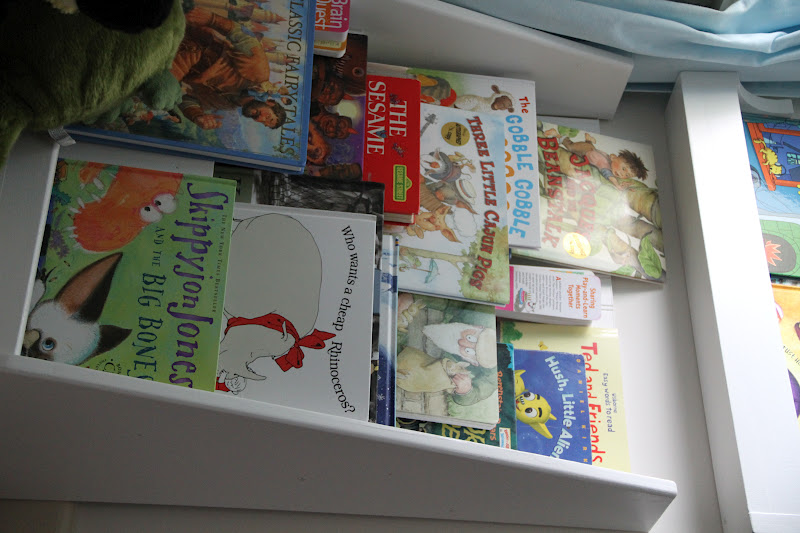

Classic Fairy Tales by Scott Gustavson; the illustrations in this book are phenomenal. I can't even explain it. We're actually putting together a puzzle now from the Jack and the Beanstalk illustration in this book.

So, there it is, Bella's bedroom. Stay tuned, I may even finish the house tour this year!

Wednesday, February 29, 2012
Coffee Filter Wreath
I've seen lots of coffee filter wreaths. After making one with my grandmother with good results, I decided to make another for Bella's room.

This was such an inexpensive and easy project. There is no need to buy a wreath form. Just grab a box or piece of cardboard and cut out a donut in whatever size you like.

Then you simply crumple some coffee filters and glue them down to the cardboard. The tighter you glue them, the more full your wreath will look. You can dip the filters in colored water for all-over color. I just wanted a hint of color, so I used some spray ink with a pink shimmer for mine. It gives it a shimmery dusty rose look in person. My cardboard circle was so small in the center that my wreath ended up looking like a big carnation, which was ok with me!


Have you ever used coffee filters to make an art project?

This was such an inexpensive and easy project. There is no need to buy a wreath form. Just grab a box or piece of cardboard and cut out a donut in whatever size you like.

Then you simply crumple some coffee filters and glue them down to the cardboard. The tighter you glue them, the more full your wreath will look. You can dip the filters in colored water for all-over color. I just wanted a hint of color, so I used some spray ink with a pink shimmer for mine. It gives it a shimmery dusty rose look in person. My cardboard circle was so small in the center that my wreath ended up looking like a big carnation, which was ok with me!


Have you ever used coffee filters to make an art project?
Tuesday, February 28, 2012
Ribbon Pinboard with Book Page Roses
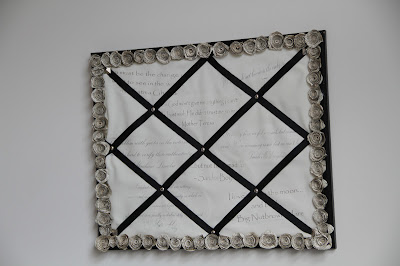
I recently finished my ribbon pinboard surrounded by paper roses made out of book pages.
 This was probably one of the most time-intensive craft projects I've ever done. I'm so glad it is finally finished.
It all started with a pin on pinterest.com, as so many of my projects do. This was the culprit that started the ball rolling:
 (Click here to check out her project website) I loved the idea of the book page roses, but the last thing I needed was another wreath. So I decided that the best place for book page roses was the office. And the most useful wall art in an office, is a corkboard or pinboard.
I started with a plain 18 x 22 corkboard with a black border that I got from Target. Like this one:
 The brown framed version is on sale for $5 right now...can't beat that. I wanted to jazz up the inside so it wasn't just a plain corkboard though.
I've never made a pinboard before. And I'll admit, I didn't even bother reading any how-to's before I did mine. I started with a yard of ivory cotton fabric from the local fabric store.
I wanted to make it more personal, so I got some iron-on transfers and picked out some quotes. I chose quotes from kids books, adult books, and famous figures. The iron-on part was more difficult than I imagined. I printed the quotes the first time and forgot that it had to be flipped to the mirror image. I fixed that and accidentally ironed on the wrong side. oops. (Which reminds me that I still need to clean that iron) Once I finally got things moving, it went well though. I got the quotes all ironed on. Then I decided I needed to press the fabric a bit to get out final wrinkles. Bad idea... I knew from my earlier 'iron on the wrong side' mistake not to put the iron directly on the decal, so I put a towel between the iron and the fabric. Only to have the towel fibers get stuck to the fabric. UGH. I decided to just make it work for the whole project. It ages it a bit, but I still like it. I won't be working with iron on decals for a while, that's for sure.

I measured out some thin batting to cover the cork area of the board. I doubled mine up to make it thicker. Then I folded the fabric with my quotes over the edges of the batting. I had some black grosgrain ribbon that I cut and positioned a crosshatch, with the ends folded around the edges and glued in place. Then I used a hot glue gun to adhere the whole fabric/batting/ribbon pad to the corkboard.
I used some decorative upholstery tacks to pin down the ribbon anywhere the ribbons crossed. It was pure luck that the tacks pressed into the corkboard well, without going all the way through.
 I had miscounted how many I needed though. I needed 4 more for the corners. The fabric store I went to didn't have the same upholstery tacks, but since it was just the 4 corners, I grabbed some fancier ones and used those.

With all that done, the only thing left was the book page roses that started the whole project. Easy, right? Wrong. Holy guacamole those things take so long to make!
So, the original wreath project has instructions and pictures of the process, (click here for that), but the gist of it (with my tweaks) is:
1. Get an old book (I chose a dictionary so I didn't feel awful for destroying a literary work)
2. Tear out 3 pages all stacked together
3. Draw a spiral on the page and use the lines to cut it out, you'll be left with a single circle from the middle...hang onto it
4. Start at the outside of the spiral and roll up the paper
5. Glue from time to time with white glue so your rose doesn't fall apart on you and to lock the last part of the rose in place
6. Turn the rose over and coat the bottom in white glue. Cover with that scrap circle from the spiral to keep everything in place.
7. Bend the edges to make it look ruffled.
The spiral is the key to what your rose looks like. I found that I liked to draw my spirals so that they were pretty evenly spaced lines (about a half an inch apart) except for in the center, where I made it bigger. So I started in the center with a circle, and spiraled outward with at least one go around at about 3/4 inch and then shrunk down so my lines were about 1/2 an inch apart for the rest of the spiral. This gave the inside of my rose a nice level look with the wider areas finishing out the outer petals. That lets you bend over the outer petals for a more realistic look.
 I did this while watching TV, but it took me 20-30 minutes per rose. This project used 67 roses, so well over 30 hours of just rose-making. These roses were like cat-crack. Pippen LOVED them. I had to lock them away to keep them safe from the crazy cat.
But after LOTS of rose making, they were finally all done. I used a hot glue gun to glue the final roses in place and had my final product! Whew! What do you think?


It all started with a pin on pinterest.com, as so many of my projects do. This was the culprit that started the ball rolling:

I started with a plain 18 x 22 corkboard with a black border that I got from Target. Like this one:

I've never made a pinboard before. And I'll admit, I didn't even bother reading any how-to's before I did mine. I started with a yard of ivory cotton fabric from the local fabric store.
I wanted to make it more personal, so I got some iron-on transfers and picked out some quotes. I chose quotes from kids books, adult books, and famous figures. The iron-on part was more difficult than I imagined. I printed the quotes the first time and forgot that it had to be flipped to the mirror image. I fixed that and accidentally ironed on the wrong side. oops. (Which reminds me that I still need to clean that iron) Once I finally got things moving, it went well though. I got the quotes all ironed on. Then I decided I needed to press the fabric a bit to get out final wrinkles. Bad idea... I knew from my earlier 'iron on the wrong side' mistake not to put the iron directly on the decal, so I put a towel between the iron and the fabric. Only to have the towel fibers get stuck to the fabric. UGH. I decided to just make it work for the whole project. It ages it a bit, but I still like it. I won't be working with iron on decals for a while, that's for sure.

I measured out some thin batting to cover the cork area of the board. I doubled mine up to make it thicker. Then I folded the fabric with my quotes over the edges of the batting. I had some black grosgrain ribbon that I cut and positioned a crosshatch, with the ends folded around the edges and glued in place. Then I used a hot glue gun to adhere the whole fabric/batting/ribbon pad to the corkboard.
I used some decorative upholstery tacks to pin down the ribbon anywhere the ribbons crossed. It was pure luck that the tacks pressed into the corkboard well, without going all the way through.


With all that done, the only thing left was the book page roses that started the whole project. Easy, right? Wrong. Holy guacamole those things take so long to make!
So, the original wreath project has instructions and pictures of the process, (click here for that), but the gist of it (with my tweaks) is:
1. Get an old book (I chose a dictionary so I didn't feel awful for destroying a literary work)
2. Tear out 3 pages all stacked together
3. Draw a spiral on the page and use the lines to cut it out, you'll be left with a single circle from the middle...hang onto it
4. Start at the outside of the spiral and roll up the paper
5. Glue from time to time with white glue so your rose doesn't fall apart on you and to lock the last part of the rose in place
6. Turn the rose over and coat the bottom in white glue. Cover with that scrap circle from the spiral to keep everything in place.
7. Bend the edges to make it look ruffled.
The spiral is the key to what your rose looks like. I found that I liked to draw my spirals so that they were pretty evenly spaced lines (about a half an inch apart) except for in the center, where I made it bigger. So I started in the center with a circle, and spiraled outward with at least one go around at about 3/4 inch and then shrunk down so my lines were about 1/2 an inch apart for the rest of the spiral. This gave the inside of my rose a nice level look with the wider areas finishing out the outer petals. That lets you bend over the outer petals for a more realistic look.

But after LOTS of rose making, they were finally all done. I used a hot glue gun to glue the final roses in place and had my final product! Whew! What do you think?


Monday, February 27, 2012
Mommy's Beloved - Closet Organization
Our classroom has been more than a little under-utilized in the past few months. (Click here to see more of our classroom) I finally decided that it was a lack of organization that was keeping me from being the best homeschool teacher ever. OK, so maybe that's wishful thinking, but more organization certainly can't hurt! So we got 2 drawer systems from Home depot. They are pre-fab cabinets, intended for things like a laundry room, but they fit better than the closet organization systems, so we went this way instead. Also, since we are renting, this has the advantage of being stand-alone. So we can always take it with us if we move. And at $89 each, they were cost effective too.
I also needed some slotted organization for things like paper. After some searching, I found the Recollections set at Michael's. And I love this set. It was simple to put together, connects to other pieces easily, was a decent price (around $30 each) and looks great. We got two sets and they are put side by side on top of the drawers. For a real craft area, I would have loved to have done it all in Recollections since it divides areas into smaller sections, but the drawers we started with are also useful for a future closet (for a future baby) so it was a good fit for us.
Anyway, here is the final product:

I couldn't bear to take a before shot. Imagine all the contents of the drawers and sections piled on the floor and you have a good idea of the before. This is 1000 times better, trust me! :)
OK, back to being the best homeschool teacher ever...
I also needed some slotted organization for things like paper. After some searching, I found the Recollections set at Michael's. And I love this set. It was simple to put together, connects to other pieces easily, was a decent price (around $30 each) and looks great. We got two sets and they are put side by side on top of the drawers. For a real craft area, I would have loved to have done it all in Recollections since it divides areas into smaller sections, but the drawers we started with are also useful for a future closet (for a future baby) so it was a good fit for us.
Anyway, here is the final product:

I couldn't bear to take a before shot. Imagine all the contents of the drawers and sections piled on the floor and you have a good idea of the before. This is 1000 times better, trust me! :)
OK, back to being the best homeschool teacher ever...
Subscribe to:
Posts (Atom)