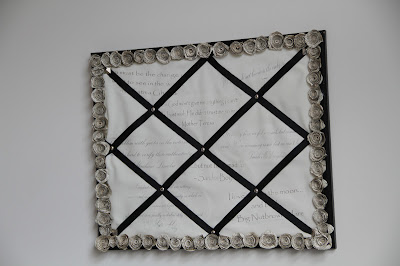
I recently finished my ribbon pinboard surrounded by paper roses made out of book pages.
This was probably one of the most time-intensive craft projects I've ever done. I'm so glad it is finally finished.
It all started with a pin on pinterest.com, as so many of my projects do. This was the culprit that started the ball rolling:
(Click here to check out her project website) I loved the idea of the book page roses, but the last thing I needed was another wreath. So I decided that the best place for book page roses was the office. And the most useful wall art in an office, is a corkboard or pinboard.
I started with a plain 18 x 22 corkboard with a black border that I got from Target. Like this one:
The brown framed version is on sale for $5 right now...can't beat that. I wanted to jazz up the inside so it wasn't just a plain corkboard though.
I've never made a pinboard before. And I'll admit, I didn't even bother reading any how-to's before I did mine. I started with a yard of ivory cotton fabric from the local fabric store.
I wanted to make it more personal, so I got some iron-on transfers and picked out some quotes. I chose quotes from kids books, adult books, and famous figures. The iron-on part was more difficult than I imagined. I printed the quotes the first time and forgot that it had to be flipped to the mirror image. I fixed that and accidentally ironed on the wrong side. oops. (Which reminds me that I still need to clean that iron) Once I finally got things moving, it went well though. I got the quotes all ironed on. Then I decided I needed to press the fabric a bit to get out final wrinkles. Bad idea... I knew from my earlier 'iron on the wrong side' mistake not to put the iron directly on the decal, so I put a towel between the iron and the fabric. Only to have the towel fibers get stuck to the fabric. UGH. I decided to just make it work for the whole project. It ages it a bit, but I still like it. I won't be working with iron on decals for a while, that's for sure.
I measured out some thin batting to cover the cork area of the board. I doubled mine up to make it thicker. Then I folded the fabric with my quotes over the edges of the batting. I had some black grosgrain ribbon that I cut and positioned a crosshatch, with the ends folded around the edges and glued in place. Then I used a hot glue gun to adhere the whole fabric/batting/ribbon pad to the corkboard.
I used some decorative upholstery tacks to pin down the ribbon anywhere the ribbons crossed. It was pure luck that the tacks pressed into the corkboard well, without going all the way through.
I had miscounted how many I needed though. I needed 4 more for the corners. The fabric store I went to didn't have the same upholstery tacks, but since it was just the 4 corners, I grabbed some fancier ones and used those.
With all that done, the only thing left was the book page roses that started the whole project. Easy, right? Wrong. Holy guacamole those things take so long to make!
So, the original wreath project has instructions and pictures of the process, (click here for that), but the gist of it (with my tweaks) is:
1. Get an old book (I chose a dictionary so I didn't feel awful for destroying a literary work)
2. Tear out 3 pages all stacked together
3. Draw a spiral on the page and use the lines to cut it out, you'll be left with a single circle from the middle...hang onto it
4. Start at the outside of the spiral and roll up the paper
5. Glue from time to time with white glue so your rose doesn't fall apart on you and to lock the last part of the rose in place
6. Turn the rose over and coat the bottom in white glue. Cover with that scrap circle from the spiral to keep everything in place.
7. Bend the edges to make it look ruffled.
The spiral is the key to what your rose looks like. I found that I liked to draw my spirals so that they were pretty evenly spaced lines (about a half an inch apart) except for in the center, where I made it bigger. So I started in the center with a circle, and spiraled outward with at least one go around at about 3/4 inch and then shrunk down so my lines were about 1/2 an inch apart for the rest of the spiral. This gave the inside of my rose a nice level look with the wider areas finishing out the outer petals. That lets you bend over the outer petals for a more realistic look.
I did this while watching TV, but it took me 20-30 minutes per rose. This project used 67 roses, so well over 30 hours of just rose-making. These roses were like cat-crack. Pippen LOVED them. I had to lock them away to keep them safe from the crazy cat.
But after LOTS of rose making, they were finally all done. I used a hot glue gun to glue the final roses in place and had my final product! Whew! What do you think?


No comments:
Post a Comment